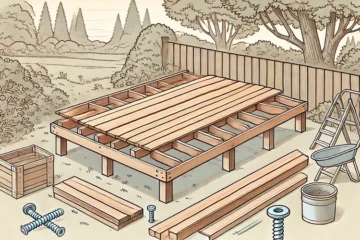
How to Install Deck Beams
Once all the posts are marked with a level line, measure down from this line a distance equal to the depth of the beam.
1. Using a square, mark all the sides of each post and cut off the waste with a circular saw. Be careful when using this saw on the side of a post. Make sure you are standing or kneeling in a stable position, and wear eye and breathing protection when making the cut.
2. Fabricate each beam using three joists that have been glued and nailed together. Work on level sawhorses, if possible, to prevent building a bow into the beam. Locate any seams in the beams directly over the middle of the posts.
3. Because the beams support all the weight of the joists and the decking above, they tend not to move. But they should be nailed to the tops of the posts nonetheless. Once the beams are in place, lay out the top edge of each beam with joist locations transferred from the ledger board.
4. Using a combination square, lay out the joist positions on the top of the beams. Mark with an “X” the side of the line where the joist should go
5. Joining the deck components with hot-dipped galvanized nails yields very sturdy joints. In coastal areas and other high-wind locations, however, some people add galvanized reinforcing plates to the joints for added protection. This beam-to-post bracket is one of the many pieces of specialized hardware that’s available.